2023年6月21日

Markdown Editor Developed with VUE

Markdown Editor Developed with VUE

Markdown Editor Developed with VUE

Utilizing Vue3, Vuetify, and marked to develop a simple Markdown editor that can instantly display the results of editing.

Setting Up a Dev Container for Vue3 Development

  • In VS Code, press F1
  • Choose ‘Dev Containers: Open Folder in Container…’
  • Select: ‘Vue community’ (Develop an application with Vue.js, includes everything you need to get up and running.)
  • Choose Node.js version: 18
  • Select additional features to install: (skip)
  • Then waiting “Adding Dev Container Configuration Files…” for couple menutes.

Create Project with Vuetify

The simplest way to set up a Vue3 + Vuetify3 project is to execute the ‘create vuetify’ command:

yarn create vuetify
# Project name: vue-md-preview
# ✔ Which present would you like ti inatll?
# ✔ > Default (Vuetify)
#     Base (Vuetify, VueRouter)
#     Essentials (Vuetify, VueRouter, Pinia)
#     Custom (Choose your features)
# ✔ Use TypeScript? Yes
# ✔ Would you like to install dependencies with yarn, npm, or pnpm? yarn

cd vue-md-preview
yarn dev

If you encounter a vite version error, you can adjust it with the following command:

yarn add @vitejs/plugin-vue@latest

Create Project with Vue3

You can also add Vuetify3 after setting up the Vue3 project. The steps are as follows:

  • Create Vue3 project:
    npm init vue@3.6.4
    # Need to install the following packages:
    #   create-vue@3.6.4
    # Ok to proceed? (y) y
    # ✔ Project name: vue-md-preview
    # ✔ Add TypeScript? › Yes
    # ✔ Add JSX Support? › No
    # ✔ Add Vue Router for Single Page Application development? › No
    # ✔ Add Pinia for state management? › No
    # ✔ Add Vitest for Unit Testing? › No
    # ✔ Add an End-to-End Testing Solution? › No
    # ✔ Add ESLint for code quality? › No
    #
    # Scaffolding project in /workspaces/vue-editor/vue-md-preview...
    #
    # Done. Now run:
    #
    cd vue-md-preview
    npm install
    npm install vuetify@^3.3.0
    npm run dev
    

Modify main.ts to Include Vuetify Packages

Modify the main.ts program to import relevant Vuetify packages. Here’s an example:

import { createApp } from 'vue'
import App from './App.vue'

// Vuetify 
import 'vuetify/styles'
import { createVuetify } from 'vuetify'
import * as components from 'vuetify/components'
import * as directives from 'vuetify/directives'

const vuetify = createVuetify({
  components,
  directives,
})

createApp(App).use(vuetify).mount('#app')

Project Folder/Files Structure

The folder and file structure of the vue-md-preview project created by Vuetify is generally as follows. In this project, we modified the content in /src/index.ts and /src/App.vue, adjusted the function registerPlugins in /plugins/index.ts to the function chaining form, and added two components, MarkdownEditor.vue and MarkdownSample.vue.

/vue-md-preview
├── node_modules/
├── public/
│   ├── favicon.ico
│   └── index.html
├── src/
│   ├── assets/
│   ├── components/
│   │   ├── MarkdownEditor.vue (add)
│   │   └── MarkdownSample.vue (add)
│   ├── plugins/
│   │   ├── index.ts (modify)
│   │   ├── vuetify.ts
│   │   └── webfontloader.ts
│   ├── App.vue (modify)
│   ├── main.js (modify)
│   └── index.css
├── .gitignore
├── package.json
├── package-lock.json
├── README.md
└── ...

Using marked to Convert markdown Text to HTML

markedjs/marked can convert markdown text into HTML for display. The steps are as follows:

yarn add marked
yarn add @types/marked --dev
or 
npm install marked
npm install @types/marked --save-dev # For TypeScript projects

Simple Markdown Editor and Preview Component

The following MarkdownEditor.vue uses the Vue3’s computed() function to instantly convert the text entered in the textarea into HTML for display. It also utilizes packages such as vuetify3 and marked.

<template>
  <v-container fluid>
    <v-row>
      <v-col cols="6">
        <v-card 
          title="Markdown Editor"  
          subtitle="Please edit Markdown syntax:">
          <v-divider></v-divider>
          <v-card-item>
            <v-textarea 
              outlined
              variant="outlined" 
              auto-grow
              no-resize
              v-model="inputMarkdown" />
          </v-card-item>
        </v-card>
      </v-col>
      <v-col cols="6">
        <v-card 
          title="Markdown Preview"
          subtitle="Below is the Markdown preview:">
          <v-divider></v-divider>
          <v-card-item>
            <div v-html="compiledMarkdown"></div>
          </v-card-item>          
        </v-card>        
      </v-col>
    </v-row>
  </v-container>
</template>

<style scoped>
</style>

<script setup lang="ts">

import { ref, computed } from "vue";
import { marked } from "marked";
import MarkdownSample from "./MarkdownSample.vue";

const inputMarkdown = ref(MarkdownSample.sampleText);
const compiledMarkdown = computed(() => marked.parse(inputMarkdown.value));

</script>

Reference

2023年4月14日

Spring Boot Beginning

Spring Boot Beginning

Index

使用 VSCode Dev Containers 開發環境

開啟 VSCode,點選 F1Ctrl+Shift+P,輸入 Dev Containers: Open Folder in containers...。選擇專案目錄,並選用 Java 作為 Dev Containers 為 Image。等待機分鐘後完成 container 啟動後,開啟 TERMINAL,並輸入下列指令來確定 Java 可正確執行:

$ java -version
$ javac -version

因為 Dev Containers 為 Linux 環境,可以用下列列指令, OS 版號,以及查詢 java 安裝位置

# 查詢 OS
cat /etc/os-release

# 查詢 Java 安裝位置
which javac

加入 GitLab

  1. 在 GitLab Create new project, 選擇 Create blank project.
  2. 執行下列指令, 以便將 local 的資料上傳到 GitLab.
git init
git remote add origin https://gitlab.com/<group>/<project>.git
git add .
git commit -m "Initial commit"
git push -u origin master

建立 Java Spring Boot 專案

要建立 Spring Boot 專案,可以利用 VS Code 的 Extension: Spring Initializr Java Support。輸入 Ctrl+Shift+X 查詢,並點選 Install in Dev Container: Java 按鍵來安裝。

安裝完成後,開啟 Command Palette Ctrl+Shift+PF1 並輸入 spring 後,選擇 Maven 或 Gradle 來建立專案。

本篇文章以 Spring Boot API 為主,使用 Maven 管理套件。因 Spring Boot 已內建 Tomcat, Jetty, Undertow 等 web server,其輸出檔案採用 Jar 即可。而 dependencies 可勾選 Spring Web, Spring Boot DevTools, 及 Spring Data。

執行 mvn -v 檢查 Marven 是否正確安裝。

接下來透過 Maven 來建立 package

mvn package

假設產出的檔案為 backend-api-0.0.1-SNAPSHOT.jar, 那麼可以執行下列指令開啟

java -jar ./target/backend-api-0.0.1-SNAPSHOT.jar

在開發期間,可以使用下列指令,以便修改程式後,即可立即編譯與重啟

mvn spring-boot:run

建立 Open API 與 Swagger UI

我們可以使用 springdoc-openapi v2.1.0 在 Spring Boot 3.0.0 顯示 swagger ui。請參考 springdoc-openapi v2.1.0 官方文件,只要在 pom.xml 加入下列文字即可:

<dependency>
  <groupId>org.springdoc</groupId>
  <artifactId>springdoc-openapi-starter-webmvc-ui</artifactId>
  <version>2.1.0</version>
</dependency>

網址 http://server:port/context-path/swagger-ui.html 可以顯示 Swagger UI 頁面,而 Open API Spec (JSON) 則是位於 http://server:port/context-path/v3/api-docs 路徑下。

如果只想產出 OpenAPI 文件 (json),而不要產出 UI, 可以指引入下列 dependency:

<dependency>
  <groupId>org.springdoc</groupId>
  <artifactId>springdoc-openapi-starter-webmvc-api</artifactId>
  <version>2.1.0</version>
</dependency>

若要使用 spring boot 2.x 版,其套件為:

<dependency>
  <groupId>org.springdoc</groupId>
  <artifactId>springdoc-openapi-ui</artifactId>
  <version>1.7.0</version>
</dependency>

Wwagger-ui 與 open api spec 路徑相同。

Spring Boot Layerd Architecture

原始碼目錄結構建議如下:

src/
├── main/
│   ├── java/
│   │   ├── beginning/
│   │   │   ├── example/
|   │   │   │   ├── backendapi/
|   │   │   │   │   ├── filters/
|   │   │   │   │   ├── configs/
|   │   │   │   │   ├── controllers/
|   │   │   │   │   ├── services/
|   │   │   │   │   ├── repositories/
|   │   │   │   │   └── models/
|   │   │   │   └── BackendApiApplication.java
|   │   │   └── resources/
|   │   │       └── application.properties
|   │   └── ...
│   └── ...
└── ...
  • controllers: 接收 http request 並回應 response。
  • models: 定義各項傳送與處理的資料結構。
  • services: 處理資料、商業邏輯。
  • repositories: 與後端資料庫連結,以存取資料。
  • filters: 應用於 middleware 程式,以 OncePerRequestFilter 為 base class,可以在 http request 與 response 加入 log 或安全檢核等作業。
  • configs: 實踐 WebMvcConfigurer 以便將上列的 filter 程式加入適當位置。

Controllers

用來簡化了開發 RESTful Web 服務。使用 @RestController Annotation 加註於 class 上方,可以接收 Get、Post、…等等 HTTP Request。

Services

負責處理業務邏輯,並且是其他層(例如控制器)的媒介。Class 上方加註 @Service,Spring 框架就會將於程式啟動時,自動建立 instance。Controller 可以透過 @Autowired 來宣告 service 變數,即可自動取得其 instance 來使用。若系統同時存在多個 service,可以利用 @Qualifier 來指定。

例如程式中包含 userService1, 與 userService2

@Service("userService1")
public class UserService1Impl implements UserService {
    // ...
}

@Service("userService2")
public class UserService2Impl implements UserService {
    // ...
}

若 controller 選用其中一個 service,範例如下

@RestController
public class UserController {
    private final UserService userService;

    @Autowired
    public UserController(@Qualifier("userService1") UserService userService) {
        this.userService = userService;
    }

    // ...
}

// 也可以不透過建構式,直接將 @Qualifier 設定在 service 變數上,使程式碼較為簡潔
@RestController
public class UserController {
    @Autowired
    @Qualifier("userService1")
    private UserService userService;

    // ...
}

若同時使用兩組 service,範例如下

@RestController
public class UserController {
    private final UserService userService1;
    private final UserService userService2;

    @Autowired
    public UserController(@Qualifier("userService1") UserService userService1, @Qualifier("userService2") UserService userService2) {
        this.userService1 = userService1;
        this.userService2 = userService2;
    }

    // ...
}

Repositories

負責處理資料的存取,例如與 database 連結,進行讀寫作業。

Models

定義資料的物件形式,例如定義 HTTP Request、Response 所需要的資料,或內部轉換所需要的資料格式等。若要透過 JPA 直接對應到 SQL 型態的 database,可以加註 @Entity、@Table、@Column 與其對應,範例如下

@Entity
@Table(name = "users")
public class User {
    @Id
    @GeneratedValue(strategy = GenerationType.IDENTITY)
    private Long id;

    @Column(name = "name")
    private String name;

    @Column(name = "email")
    private String email;

    // getter and setter methods...
}

Filters

Spring Boot 的 Filter 為 http request 的 middleware,可以攔截 http request 與 response 的資訊,並進行處理,例如加入 log、安全檢核、加解密等作業。

方式很簡單,只要繼承 OncePerRequestFilter 並複寫 doFilterInternal 方法即可。

但完成 Filter 程式碼後,還需要透過 configure 向 spring 註冊。

@Configuration

利用 @Configuration 將 Filter 定義為 @Bean,以便注入容器 (Dependency Injection Container)。Spring Boot 會在 DI Container 中尋找 interface 的 Filter,在接收到 http request 時來呼叫。Interface Filter 定義如下:

package javax.servlet;
import java.io.IOException;

public interface Filter {
    void init(FilterConfig filterConfig) throws ServletException;
    void doFilter(ServletRequest request, ServletResponse response, FilterChain chain)
            throws IOException, ServletException;
    void destroy();
}

Configure File: application.properties

執行 mvn package 後,會將設定檔案 application.properties 複製到 target/classes 目錄下。application.properties 可以用來存放因安裝環境不同而需要變動的資料,例如資料庫連線位置。

Dockerfile

建立 Docker Image:

docker build -t try-spring-boot .

反覆執行時,舊的 try-spring-boot image 不會刪除,而會將名稱改為 <none>,下列語法可以刪除這些不用的 <none> image

docker image prune -f
# 或串聯之前 build 語法
docker build -t try-spring-boot . && docker image prune -f

執行 Container:

docker run -d --name try-spring-boot -p 8080:8080 try-spring-boot

若要查看執行中 container 的 log, 可以使用下列指令

docker logs try-spring-boot

# 或持續輸出 log, 直到輸入 Ctrl-C
docker logs try-spring-boot -f

停止 Container:

docker stop try-spring-boot

開啟網頁:

連接 MongoDB

首先,我們可以先試著執行兩個 container,其中一個負責 mongoDB,另一個執行 mongosh,透過 docker network 的指派,來進行連線,與存取資料。下列範例會以 mongo shell 建立並進入 test dbs。

docker network create try-spring-boot-network
docker run --name try-spring-boot-mongo --rm --network try-spring-boot-network -v ${pwd}/temp-db-storage:/data/db -d mongo
docker run --name try-spring-boot-mongo-sh --rm --network try-spring-boot-network -it mongo mongosh --host try-spring-boot-mongo test

在上列指令中,第二段指令,在沒有指定 --hostname 參數下,host name 預設等於 container name。因此 shell 可以經由此 host name 與 mongoDB 進行連線。但本機連接容器仍然需要使用 localhost 來進行連接。
要離開 mongo shell,可以輸入 .exit 即可。

如果要透過環境變數設定帳號與密碼,可以使用下列指令

docker network create try-spring-boot-network
docker run --name try-spring-boot-mongo --rm --network try-spring-boot-network -v ${pwd}/temp-db-storage:/data/db -d -e MONGO_INITDB_ROOT_USERNAME=root -e MONGO_INITDB_ROOT_PASSWORD=example mongo

docker run --name try-spring-boot-mongo-sh --rm --network try-spring-boot-network -it mongo /bin/bash
# 進入 try-spring-boot-mongo-sh 後,輸入下列命令啟動 mongosh
mongosh --host try-spring-boot-mongo --username root --password example --authenticationDatabase admin

若要在 dev container 中與上列所建立的 mongo 連線,則需要先在 ./devcontainer/devcontainer.json 指定相同的 network

{
	"name": "Java",
	"image": "mcr.microsoft.com/devcontainers/java:0-17",
  // 將 dev container 也加入 try-spring-boot-network 網路中
	"runArgs": [
		"--network=try-spring-boot-network"
	],

	"features": {
		"ghcr.io/devcontainers/features/java:1": {
			"version": "none",
			"installMaven": "true",
			"installGradle": "false"
		}
	}
}

此外,修改 application.properties,及 vscode launch.json 來設定連線。

spring.data.mongodb.uri=mongodb://${MONGO_USERNAME:root}:${MONGO_PASSWORD:example}@${MONGO_HOST:mongo}:${MONGO_PORT:27017}/${MONGO_DATABASE:test}?authSource=${MONGO_AUTH_SOURCE:admin}&authMechanism=${MONGO_AUTHMECHANISM:SCRAM-SHA-1}
{
    "version": "0.2.0",
    "configurations": [
        {
            "type": "java",
            "name": "BackendApiApplication",
            "request": "launch",
            "mainClass": "beginning.example.backendapi.BackendApiApplication",
            "projectName": "backend-api",
            "env": {
                "MONGO_USERNAME": "root",
                "MONGO_PASSWORD": "example",
                "MONGO_HOST": "try-spring-boot-mongo",
                "MONGO_PORT": "27017",
                "MONGO_DATABASE": "test",
                "MONGO_AUTH_SOURCE": "admin",
                "MONGO_AUTHMECHANISM": "SCRAM-SHA-1"
            }
        }
    ]
}

要同時啟動多個容器,docker-compose 會是一個更加便利的選擇,透過下列方式,可以將先前的 Java 程式也一併啟用。

version: '3.1'

services:

  mongo:
    image: mongo
    container_name: try-spring-boot-mongo
    restart: always
    volumes:
      - ${PWD}/temp-db-storage:/data/db
    environment:
      MONGO_INITDB_ROOT_USERNAME: root
      MONGO_INITDB_ROOT_PASSWORD: example
    networks:
      - try-spring-boot-network

  mongo-express:
    image: mongo-express
    container_name: try-spring-boot-mongo-express
    restart: always
    ports:
      - 8081:8081
    environment:
      ME_CONFIG_MONGODB_ADMINUSERNAME: root
      ME_CONFIG_MONGODB_ADMINPASSWORD: example
      ME_CONFIG_MONGODB_URL: mongodb://root:example@mongo:27017/
    networks:
      - try-spring-boot-network

  try-spring-boot:
    image: try-spring-boot
    container_name: try-spring-boot
    ports:
      - "8080:8080"
    environment:
      MONGO_USERNAME: root,
      MONGO_PASSWORD": example,
      MONGO_HOST: try-spring-boot-mongo,
      MONGO_PORT: 27017,
      MONGO_DATABASE: test,
      MONGO_AUTH_SOURCE: admin,
      MONGO_AUTHMECHANISM: SCRAM-SHA-1
    networks:
      - try-spring-boot-network      

networks:
  try-spring-boot-network:
    driver: bridge

上列 yaml 可以透過下列指令來啟動或停止

docker-compose up -d
docker-compose down

建立 DevContainer 測試環境

要在 DevContainer 中進行 debug,可以參考專案根目錄的 PowerShell Script setup-mongo-container.ps1 來建立 docker network 並啟動 mongo。同時注意,.vscode/launch.json 應設定相關的 configure.env 資訊。

setup-mongo-container.ps1 內容如下:

# 1. Check if the directory does not exist, then create it
if (!(Test-Path -Path .\temp-db-storage)) {
    New-Item -ItemType Directory -Path .\temp-db-storage
}

# 2. Check if the try-spring-boot-network does not exist, then create it
$networkExists = docker network ls --filter name=try-spring-boot-network --format "{{.Name}}" -q
if (!$networkExists) {
    docker network create try-spring-boot-network
}

# 3. Check if the container exists, stop and remove it if it does, then run the new container
$containerExists = docker container ls -a --filter name=try-spring-boot-mongo --format "{{.Names}}" -q
if ($containerExists) {
    docker container stop try-spring-boot-mongo
    docker container rm try-spring-boot-mongo
}

docker run --name try-spring-boot-mongo --rm --network try-spring-boot-network -v ${pwd}/temp-db-storage:/data/db -d -e MONGO_INITDB_ROOT_USERNAME=root -e MONGO_INITDB_ROOT_PASSWORD=example mongo
2023年2月3日

TortoiseGit 以 SSH 連結 GitLab

TortoiseGit 以 SSH 連結 GitLab

使用 TortoiseGit 以 SSH 連結 GitLab,因 RSA private key 格式不同,而有兩種方式。

TortoiseGit 所使用的 SSH Client 預設為 TortoiseGitPlink.exe,必須搭配其 PuTTYgen 所產出的 .ppk 檔案。

若要使用 OpenSSH 則需要變更 SSH Client 的設定。

使用 PuTTYGen

建立 RSA Public/Private Key

安裝 TortoiseGit 後,PuTTYgen 也會同時存在 C:\Program Files\Git\usr\bin 的目錄下。在 Windows 搜尋 PuTTYGen 便可以找到此程式。

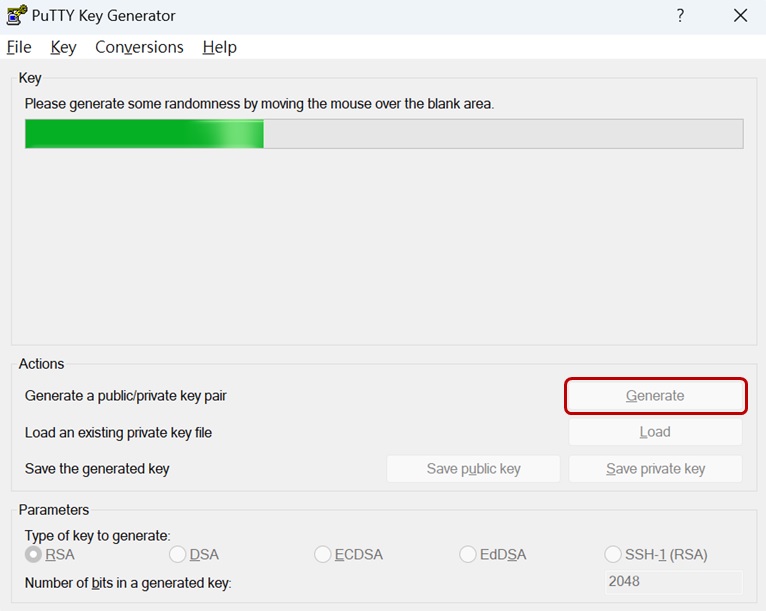
開啟 PuTTYgen 程式,選擇 RSA (預設),並點選 generate 按鍵後,不斷移動滑鼠,便可建立 public/private key pair。
PuTTYgen generate

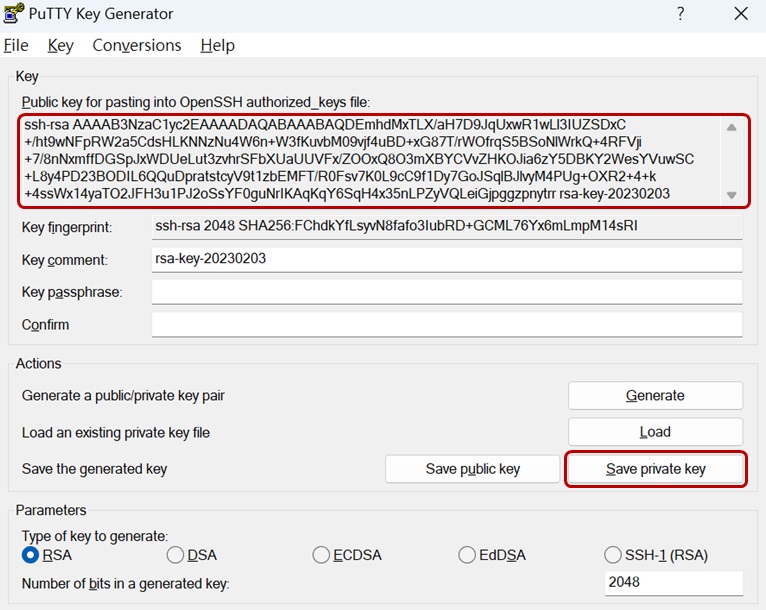
Public key 會直接呈現在 PuTTY Key Generator 的畫面上,可用來複製到 GitLab 中,而 private key 則可點選 Save private key 按鍵,存放在指定的目錄下,以便提供給 TortoiseGit 使用。

PuTTYgen key pair

將 Public Key 複製到 GitLab

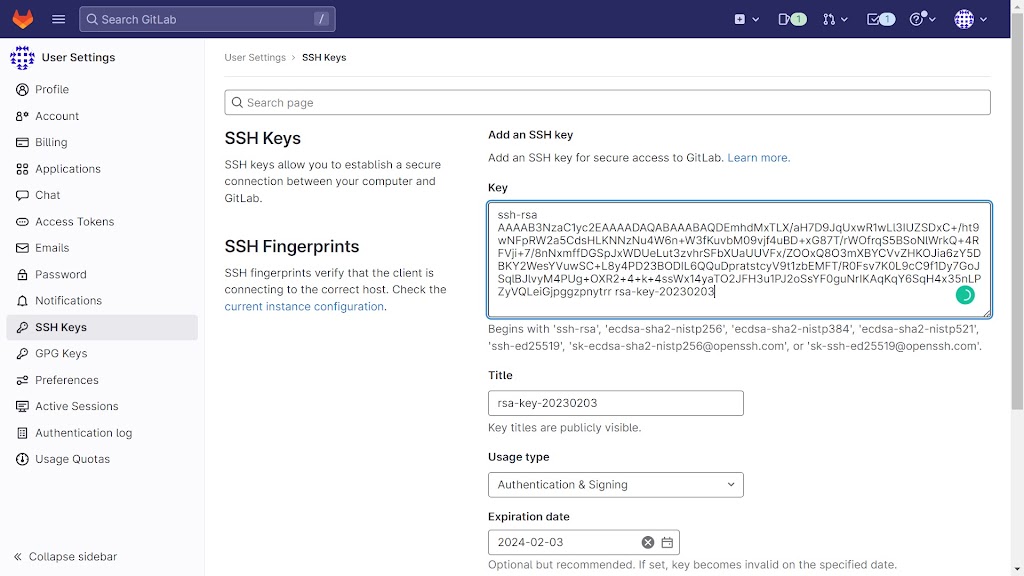
點選 GitLab 右上角 icon,進入 Preferences 畫面。選擇 SSH Keys 功能,將 public key 複製到 Key 的 textbox 中。

gitlab ssh

TortoiseGit 指定 Private Key

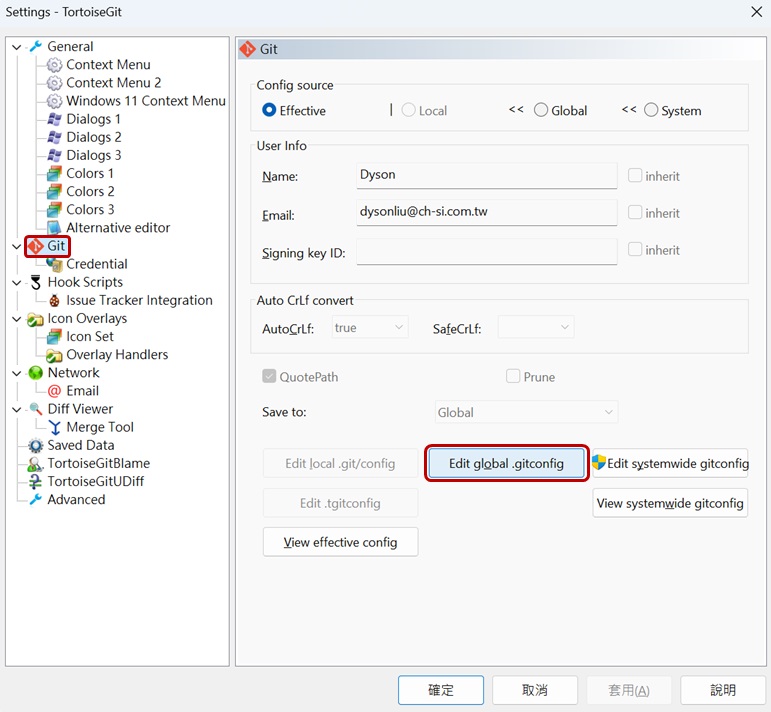
開啟 TortoiseGit Settings,點選左側樹狀 Git 選項,再點選 Edit global.gitconfig 按鍵,開啟編輯視窗。

Tortoise Setting SSH

參考下列範例,設定 puttykeyfile 指向 RSA private key 所存放的位置:

[user]
	name = your-name
	email = your-name@domain-name.com
[remote "origin"]
	puttykeyfile = c:\\ssh\\private-key.ppk

透過 SSH Clone 原始碼

首先進入 GitLab 網站,選擇專案,如下圖示,點選 Clone 並複製 Clone with SSH 裡的內容:
gitlab clone by ssh

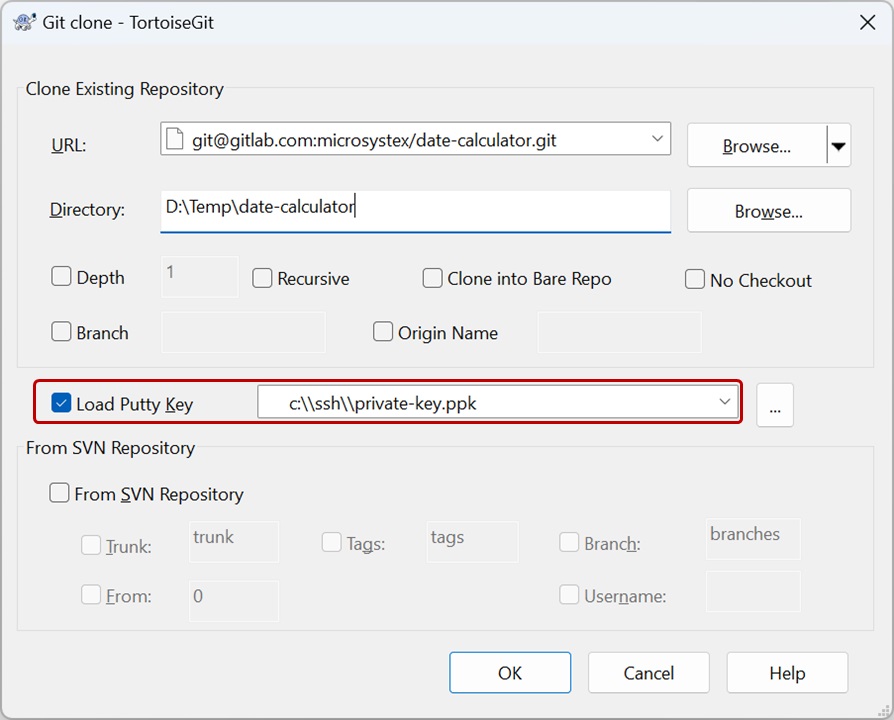
以檔案總管建立專案目錄,並以 Tortoise 的 Clone 功能,確定 Load Putty Key 指到 RSA private 所在位置,按下 OK 便可完成作業:
tortoise clone by ssh

使用 OpenSSH

另一個方法是採用 OpenSSH 來建立 RSA Key Pair。首先透過 PowerShell 以下列指令來建立:

ssh-keygen -o -t rsa -C "your@email.com"

上列指令所使用的參數說明如下表:

參數 說明
-o 使用 open ssh 演算法
-t rsa 採用 rsa
-C “…” 加入註解

執行 ssh-keygen 之後,將於c:\Users\<user-name>\.ssh 目錄中產出 id_rsa 與 id_rsa.pub 兩個文字檔案。其中 id_rsa 存放 RSA private key,而 id_rsa.pub 存放的是 RSA public key。

產出 RSA key pair 後,先將 id_rsa.pub 內容 (public Key) 複製到 GitLab 的 SSH Key 中。您可以嘗試直接在 PowerShell 下 git clone 指令,將原始碼複製到本機:

git clone git@gitlab.com:microsystex/date-calculator.git

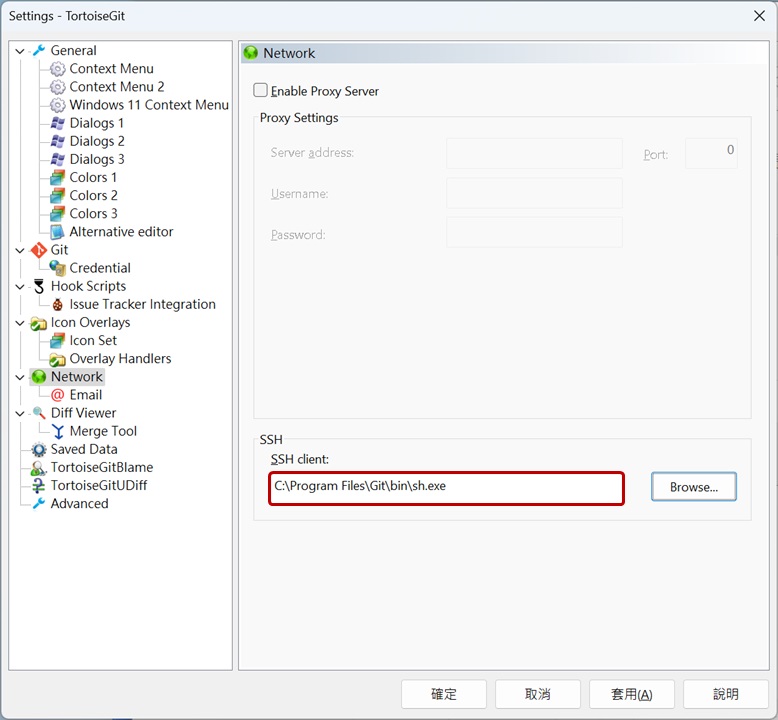
如果要使用 TortoiseGit 的 Clone 功能,則需要修改 SSH client。如下圖所示,開啟 TortoiseGit Settings,點選 Network,將 SSH client 由預設的 C:\Program Files\TortoiseGit\bin\TortoiseGitPlink.exe 改為C:\Program Files\Git\bin\sh.exe

Tortoise SSH client

如此,便能以 OpenSSH 作為 TortoiseGit 與 GitLab 的連線安全機制了。


參考資料:


2023年2月1日

建立 Docker Image

建立 Docker Image

本文以下列情境進行說明:由 Docker Registry (Container Registry) 取得 Nginx Image、執行 Container 並添加檔案或程式、退到背景與檢查執行狀態、打包新的 Image、最後上傳至 Docker Registry。

使用 Nginx 為 Web APP 為範例

  1. 取得官方所提供之 nginx image

    docker pull nginx
    
  2. 啟動 nginx 成為 web server

    docker run -d -p 8080:80 --name webserver nginx
    
    參數 說明
    -d 同於 --detach,是將 container 以背景方式執行
    -p 將本機 port 對應到 container 中的 port
    –name 指定容器名稱
    nginx 為 docker image 名稱

    執行後,在瀏覽器輸入 localhost:8080,便可以看到 Welcome to nginx! 網頁

  3. 停止、啟動、重啟 container

    docker stop webserver
    docker start webserver
    docker restart webserver
    
  4. 進入 container shll Section
    首先確定 container 在執行狀態,輸入下列指令,可以進入 shell 環境

    docker exec -it webserver sh
    
    說明
    i 同於 --interactive,保持 STDIN 互動模式
    t 同於 --tty,為 pseudo-tty,進入終端機模式,通常與 -i 同時使用,可直接輸入 -it

    Nginx 預設首頁位於 /usr/share/nginx/html/index.html,可以使用下列指令來確認:

    # cat /usr/share/nginx/html/index.html
    

    在 bash 命令下,可以輸入 exit 離開 terminal,回到 PowerShell。

  5. 複製檔案取代預設網頁
    簡單撰寫一個 Hello World 的 HTML

    <!DOCTYPE  html>
    <html>
    <head>
    	<title>Hello World Sample</title>
    </head>
    <body>
    	Hello World!
    </body>
    </html>
    

    透過 docker cp 將檔案覆蓋 container 的首頁

    docker cp ./index.html webserver:/usr/share/nginx/html
    

    在瀏覽器輸入 localhost:8080,便可以看到首頁已更新。

  6. 建立新的 image name
    使用 docker commit 將 container 儲存為新的 image。

    docker commit webserver <docker_hub_account>/hello_world_nginx:1.0
    
  7. 停止並刪除 container
    接下來停止目前執行中的 container,並刪除

    docker stop webserver
    docker rm webserver
    
  8. 測試新建立的 docker image
    執行新建立的 docker image,並以瀏覽器測試 localhost:8080

    docker run -d -p 8080:80 \
      --name webserver \
      <docker_hub_account> \
      /hello_world_nginx:1.0
    
  9. 登入 docker hub 並將新的 docker image 上傳
    首先登入 docker hub

    docker login
    

    接下來便可以上傳至 docker hub

    docker push <docker_hub_account> \
      /hello_world_nginx:1.0
    

    完成後,便可以在 docker hub 網頁中,看到新增的 docker image。


參考資料:
Docker 指令小抄
How to Create a Docker Image From a Container


預設 Docker Desktop Volume 對應本機目錄

預設 Docker Desktop Volume 對應本機目錄

在 Windows 上使用 Docker Desktop 並採用 WSL 2 back-end 時,若未指定 volume 對應(mount)的目錄,其預設位置為: \\wsl$\docker-desktop-data\version-pack-data\community\docker\volumes,可以利用檔案總管輸入此路徑來查看。
另外,檔案路徑也可以使用下列格式來輸入: \\wsl.localhost\docker-desktop\mnt\host\wsl\docker-desktop-data\version-pack-data\community\docker\volumes\

參考資料:
where docker image is stored with docker-desktop for windows?

2023年1月27日

安裝 JDK

安裝 Java JDK

對於初學 Java 的人,建立 JDK 開發環境,常會造成困擾。
OpenJDK 僅是 Open Source 原始碼,其二進位則是由許多供應商 (Distributions) 所發布。要在 Windows 上安裝時,大致上,需要注意三個重點:JDK 版本、供應商,以及設定環境變數。

JDK 版本

JDK 各版本的詳細資料,可以在 Wikipedia 查看。但通常我們只會專注在 LTS (Long-term support) 的版本,以下列出主要的三個 LTS 版號資訊:

版號 發布時間 簡要說明
8 2014-03 Lambdas
支援 Spring 5.3.x 及 Spring Boot 2.x
11 2018-09 New HTTP Client
支援 Spring 5.3.x 及 Spring Boot 2.x
17 2021-09 Sealed Classes
支援 Spring Framework 6 及 Spring Boot 3

供應商 (Distributions)

列表如下:

安裝 BellSoft Liberica JDK version 17

Spring Quickstart Guide 官方網站裡 ,建議使用 BellSoft Liberica JDK version 17。進入 BellSoft 下載 SDK 時,會發現提供各版本之 JDK,下列範例,將使用 JDK 17 LTS 來示範。下載的檔案格式為 .msi,因此可以很容易依照步驟完成安裝。

設定環境變數

如果您的 Windows 環境,還沒有安裝其他版本之 JDK,BellSoft 安裝程式會自動在 Windows 環境變數/系統變數 中,加入 JAVA_HOME 變數以及增添 Path 路徑,預設資料如下:

變數
JAVA_HOME C:\Program Files\BellSoft\LibericaJDK-17\
Path C:\Program Files\BellSoft\LibericaJDK-17\bin\

完成安裝後,開啟 PowerShell 輸入下列指令,查看輸出結果,來確定安裝是否成功:

> java --version
openjdk 17.0.6 2023-01-17 LTS
OpenJDK Runtime Environment (build 17.0.6+10-LTS)
OpenJDK 64-Bit Server VM (build 17.0.6+10-LTS, mixed mode, sharing)
> javac --version
javac 17.0.6

建立 Hello World 程式

利用 spring initializr 可以快速建立 project。您可以透過 spring initializr 網站所提供的介面設定選項,並下載專案;或直接在 vscode 的命令列 (Ctrl+Shift+P),搜尋 “spring initializr” 依步驟執行,都可以建立起專案。

在專案中的 src\main\java\com\example\demo 目錄下,開啟 DemoApplication.java,並參考下列範例修改內容:

package  com.example.demo;

import  org.springframework.boot.SpringApplication;
import  org.springframework.boot.autoconfigure.SpringBootApplication;
import  org.springframework.web.bind.annotation.GetMapping;
import  org.springframework.web.bind.annotation.RequestParam;
import  org.springframework.web.bind.annotation.RestController;

@SpringBootApplication
@RestController
public  class  DemoApplication {
	public  static  void  main(String[] args) {
	SpringApplication.run(DemoApplication.class, args);
	}
	
	@GetMapping("/hello")
	public  String  hello(@RequestParam(value = "name", defaultValue = "World") String  name) {
		return  String.format("Hello %s!", name);
	}
}

開啟 terminal (Ctrl+`),輸入:

./mvnw spring-boot:run

執行後,以瀏覽器開啟 http://localhost:8080/hello,即可看到 Hello World! 網頁。


參考資料:


2023年1月26日

GCP Artifact Registry

GCP Artifact Registry

簡介 GCP Artifact Registry,並提供範例,逐步介紹將 Docker Image Push 至 GCP Artifact Registry。

Artifact Registry 改進原有的 Container Registry,可以同時存放 container images 與 non-container artifacts,如 Maven、npm、Python、Apt、Yum、Kubeflow Pipelines 等套件。

文章範例執行於 Windows 11 環境,使用 PowerShell 7.3.1。

GCP Push and pull images

前置作業

  1. 建立 GCP Project (本範例為 artifact-registry-dyson)
  2. 本機需要安裝 Docker

Google Cloud CLI Installer

若您尚未安裝 gcloud CLI,可參考下列網頁進行安裝: Install the gcloud CLI

安裝後,會詢問是否要登入與選擇預設的專案名稱。完成後, 便可以在 PowerShell 輸入 gcloud 指令了。

Create Repository

選擇您想要加入的 GCP Project,新增 Artifact Registry,相關設定選項如下:
- Name: quickstart-docker-repo (Repository 名稱,您可自行設定)
- Format: Docker
- Location Type: Region
- Region: us-central1
Region 也可以選擇 asia-east1 (Taiwan),機房位於彰濱工業區。

設定授權

執行下列指令,將修改 docker configuration 內容:

gcloud auth configure-docker \
  us-central1-docker.pkg.dev

若 Region 選擇 asia-east1,那麼上列指令,則改為:

gcloud auth configure-docker \
  asia-east1-docker.pkg.dev

檢查 docker configuration,會發現新增了 credHelpers 區塊。執行下列指令:

cat $env:UserProfile\.docker\config.json

顯示結果如下:

{
"credsStore": "desktop",
"credHelpers": {
  "us-central1-docker.pkg.dev": "gcloud"
  }
}

Pull Docker Image

接下來,您可以自行開發或由 Docker Hub 取得 Docker Image:

docker pull nginx

Tag Docker Image

在 push docker image 之前,先將剛才新增的 container registry,以 respository name 透過 tag 加入 docker image 中。

Tag 的規則是 <hostname>/<project-name>/<repository-name>/<image-name>:<tag>

docker tag nginx \
  us-central1-docker.pkg.dev \
  /artifact-registry-dyson \
  /quickstart-docker-repo \
  /nginx-image:tag1
  • artifact-registry-dyson: GCP Project ID,這是您可以自行建立的專案名稱
  • us-central1: 為 repository host 所在位置,
  • docker.pkg.dev: Docker repositories 的 hostname
  • nginx-image: Docker image name

Push Docker Image

最後,並可以將 Docker push 至私有的 registry

docker push us-central1-docker.pkg.dev \
/artifact-registry-dyson \
/quickstart-docker-repo \
/nginx-image:tag1```

***
參考資料:
- [Artifact Registry: the next generation of Container Registry](https://cloud.google.com/blog/products/application-development/understanding-artifact-registry-vs-container-registry)
***

Deploying Vue & .NET with Google OAuth on GCP Cloud Run

Deploying Vue & .NET with Google OAuth on GCP Cloud Run Deploying Vue & .NET with Google OAuth on GCP Cloud Run...